
July 9, 2013
Metric Conversions Made Simple
Hi guys! I put together a simple metric conversion chart for ya. More and more people are using the metric system when baking or cooking so I thought this would be an easy guide for everyone. Right click and save image for future reference!

June 17, 2013
Refreshing Cilantro Peanut Slaw - VEGAN / GLUTEN-FREE
I've been making this cool & refreshing cabbage slaw, twice a week, for over two months now. It is absolutely one of my favorite side dishes. What's great is not only the taste but that it's actually light and healthy! I love healthy food that tastes good =). It is also vegan and can be made gluten-free!
I adapted the recipe Spicy Cilantro Peanut Slaw from Kalyn's Kitchen & could not be happier with the outcome! I just made a few simple changes and feel free to do the same with my version.
Here's what you need and what you need to do...
SLAW COMPONENTS
1/2 large head green cabbage, thinly sliced
1/2 small head red cabbage, thinly sliced
1/2 cup peanuts, roughly chopped (I used Planter's Dry Roasted Low Sodium)
1/2 cup green onions, thinly sliced (I only used the green parts)
1/2 bunch of cilantro, thinly sliced

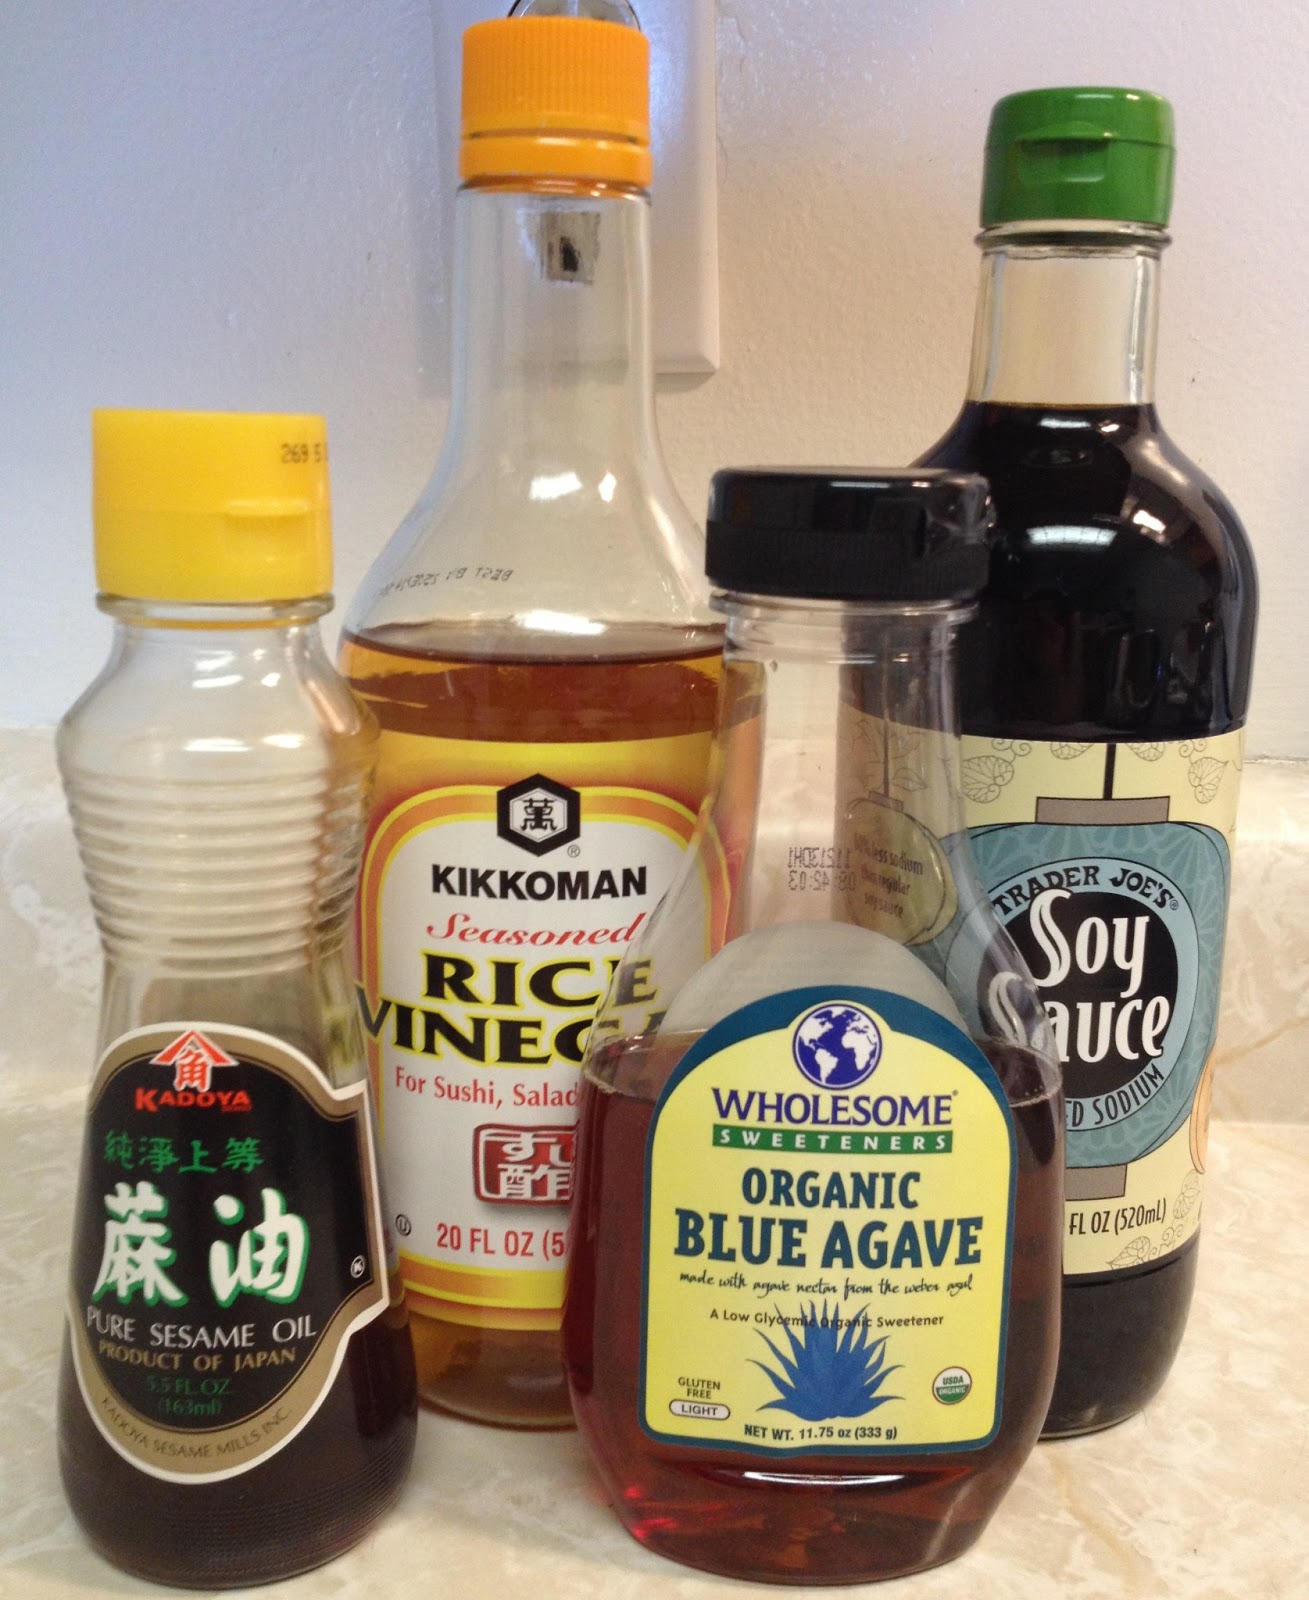
DRESSING COMPONENTS
2 Tbs rice vinegar (I used seasoned, unseasoned is okay too)
1 Tbs light agave nectar
1 Tbs roasted sesame oil
2 tsp soy sauce (or tamari to make dish gluten-free; read the label of the tamari though, not all brands are gf)

TIME TO GET TO WORK!
Cut both cabbage heads in half. Remove the cores from both heads then cut both cabbage halves into 1/4" slices. Turn the halves and slice in half to shorten the length of the strands. Chop peanuts. Slice green onions and cilantro. Place slaw components in a medium size bowl.
In a small bowl, combine dressing ingredients and whisk till thoroughly combined. You can also use a fork to do this in case you don't have a whisk on hand ;).
Pour dressing onto slaw. Grab salad tongs to thoroughly toss the deliciousness or use two forks to toss. Just get it mixed up! Feel free to add salt and pepper to taste or let your guests add to their own serving. I don't add either, I think it's perfect as is!

This slaw is best served immediately! It will hold for a day or two, refrigerated, in a tightly sealed container. That is, if it'll last that long...you may not be able to control yourself and sneak bites throughout the day because it's just that good!

Enjoy!
I adapted the recipe Spicy Cilantro Peanut Slaw from Kalyn's Kitchen & could not be happier with the outcome! I just made a few simple changes and feel free to do the same with my version.
Here's what you need and what you need to do...
SLAW COMPONENTS
1/2 large head green cabbage, thinly sliced
1/2 small head red cabbage, thinly sliced
1/2 cup peanuts, roughly chopped (I used Planter's Dry Roasted Low Sodium)
1/2 cup green onions, thinly sliced (I only used the green parts)
1/2 bunch of cilantro, thinly sliced

DRESSING COMPONENTS
2 Tbs rice vinegar (I used seasoned, unseasoned is okay too)
1 Tbs light agave nectar
1 Tbs roasted sesame oil
2 tsp soy sauce (or tamari to make dish gluten-free; read the label of the tamari though, not all brands are gf)
TIME TO GET TO WORK!
Cut both cabbage heads in half. Remove the cores from both heads then cut both cabbage halves into 1/4" slices. Turn the halves and slice in half to shorten the length of the strands. Chop peanuts. Slice green onions and cilantro. Place slaw components in a medium size bowl.
In a small bowl, combine dressing ingredients and whisk till thoroughly combined. You can also use a fork to do this in case you don't have a whisk on hand ;).
Pour dressing onto slaw. Grab salad tongs to thoroughly toss the deliciousness or use two forks to toss. Just get it mixed up! Feel free to add salt and pepper to taste or let your guests add to their own serving. I don't add either, I think it's perfect as is!

This slaw is best served immediately! It will hold for a day or two, refrigerated, in a tightly sealed container. That is, if it'll last that long...you may not be able to control yourself and sneak bites throughout the day because it's just that good!

Enjoy!
April 4, 2012
Oatmeal, Peanut Butter, Chocolate Chip Cookies
Oatmeal Peanut Butter Chocolate Chip Cookies by Jose Bowen.
*His recipe, my kitchen.*
I've been on a cookie kick lately =). I had been searching for an outstanding oatmeal cookie recipe that satisfied the masses. I read review after review of countless recipes and came across this one. Ohhh my goodness...the reviews were fantastic and just reading them made my mouth water.
Now, I collect recipes from all over. I have a gazillion cookbooks, sites I frequent, recipes from school, family and ones that I have created on my own. This recipe, for some reason, was screaming out to me! As soon as I was done reading it, I jumped out of my chair and made a mad dash to the kitchen. I *rarely* do that! I usually save the recipe and eventually try it out weeks, if not moths, later. Let me tell you, I'm glad I didn't wait...the outcome was FANTASTIC!
How can a cookie that's so chewy, moist and decadent make me pirouette around the kitchen as I eat them?! Maybe because it contains several of my favorite baking components...oatmeal, peanut butter and chocolate? Who doesn't love that combination?!
I had thoughts of changing the recipe around a bit but decided to make it as is and I'm sure glad I did. Thank you, Jose Bowen, for sharing such a wonderful recipe. This one is definitely a keeper and I'll be making this often =).

Here's what you need and what you need to do:
INGREDIENTS
`1 1/2 c old-fashioned rolled oats (not instant oats)
`2 c all purpose flour
`1 tsp baking powder
`1 tsp salt
`1 c (2 sticks) unsalted butter, softened
`1 c granulated sugar
`1 c packed light brown sugar
`1 Tbs vanilla extract
`3/4 c peanut butter (I used low sodium crunchy pb)
`2 large eggs
`12 oz bag of semisweet chocolate chips
DIRECTIONS
1. Preheat your oven to 325 degrees F.
2. Combine first five ingredients in a medium size bowl, stir with a fork to combine and break up any lumps.
3. In the bowl of an electric mixer, beat the butter and sugars together till light and fluffy (approx 3-4 min).
4. Beat in vanilla and peanut butter. Add one egg, beat well, stop mixer and scrape down sides and bottom of bowl. Add second egg, beat well and scrape the bowl once again.
5. Gradually beat in the flour mixture on low until just combined. Add chocolate chips and mix until, again, just combined.
6. Using a spoon or ice cream scoop, scoop dough onto an ungreased baking sheet. Flatten balls slightly.
7. Bake cookies for approximately 15 minutes or till slightly golden. Rotate your pan half way through the baking process for even baking. Transfer to racks to cool completely.
ENJOY!
March 23, 2012
Favorite Cookbooks
A few of you have asked me what my favorite cookbooks are. Well, guess what?! I'm an avid cookbook collector and would love to share my opinion and thoughts, thanks for asking!
After working with different chefs and pastry chefs, I've learned that some will only pick up cookbooks from those that are very well known in our industry. Then there's some who try to gain knowledge and creativity through many different chefs and outlets. I fall into the second category ;).
I may not always think the lesser known chef's recipes are the greatest...I mean, the best are the best for a reason, right? However, that doesn't mean that they don't have something to offer!
Here are a few of my favorites:

LOL ok, ok...yes, I started with famed Pastry Chef Pierre Hermé...but darn it, his book is awesome! Want to know why? In comparison to other macaron books I've picked up, Chef Hermé does a wonderful job at breaking down each and *every* step on how to make the perfect macaron. I mean EVERY step. How many steps, you ask? Thirty-two! Yes, you read that right...THIRTY-TWO. He also offers a picture at every step so you can make sure you're doing things correctly. If you're looking for the best book on how to make macarons...look no further. I picked up a copy on Amazon.co.uk since the English version wasn't available on the US site at the time and the sellers who were selling the book were way overpriced!

Heidi Swanson,(@101cookbooks), has wonderful recipes in her book "Super Natural Every Day". I adore her blog and her recipes are delicious! Her book offers nourishing vegetarian dishes that can easily be converted to vegan. She has helped open up my world to fresh and *flavorful* foods. Her Quinoa Patties made with garlic, parmesan and fresh herbs offers a slightly salty, toasty crunch but at the same time, they melt in your mouth! Yummmmmy goodness...you can't tell me that you're not salivating looking at the picture of them ;). It's ok...just don't let anyone see you drool...it'll be our secret ;).

Last but definitely not least..."Vegan Cupcakes Take Over The World" by Isa Chandra Moskowitz & Terry Hope Romero.

These two ladies have done an outstanding job with the recipes they offer us. Their books, "Veganomicon", "Vegan Pie in the Sky", and "Vegan Cookies Invade Your Cookie Jar", to name a few, have made such an impact for many vegans and aspiring vegans. In the book "Vegan Cupcakes Take Over The World" they offer mouth watering cupcakes that are simple to make and these delightful recipes let vegans indulge in dessert. Who says you have to be vegan to enjoy these cupcakes though?! Believe me, there's a cupcake for everyone!
A couple recipes I've tried were their "Banana Split Cupcakes" and their "Coconut Lime Cupcakes". The banana split flavor took me back to my childhood when my parents would take me to O'Farrell's Ice Cream shop. The three of us would plop down in a booth, order up a huge banana split and "argue" over who has eaten more than their share of whipped cream, nuts or fudge =).
The coconut lime reminded me of my visit to Lahaina in Maui and discovering coconut lime body lotion for the first time at a little shop on the water that sat near their famous Banyan Tree. This was before the scent became huge at Bath & Body Works lol ;). The smell of coconuts and lime in the warm breeze while watching the sunset...oh my gosh, I *must* go back soon!
Such wonderful memories...
OK, back to the cupcake! The mixture of lime zest and coconut flavor in the moist cake with the slightly tart lime frosting AND coconut shavings...need I say more?! If you're dreaming of Maui now, don't forget to take me with you! I'll make you all the cupcakes you want ;)!
So, there it is...three of my favorite cookbooks. What are some of your "go-to" cookbooks?
*All photos come directly from books mentioned.*
March 15, 2012
White Chocolate, Strawberry Marshmallow, Brown Rice Crisps Cookies
This is a recipe I adapted from Milk - Momofuku Milk Bar...
I saw these cute Hello Kitty marshmallows at a local Japanese store, which reminded me of the Momofuku recipe, I had to use them! I used to have Hello Kitty *everything* when I was a kid...pencils, erasers, book bags. Even now, I still love HK with their handbags and wallets. I'm a kid at heart, I guess =).

I wanted to try something a little different than Momofuku's Cornflake-Chocolate-Chip-Marshmallow Cookie recipe. Cornflakes? Nah, I love rice crispies! Plain marshmallows? Heck no! I love the strawberry filled/scented ones. Regular chocolate chips? Hmm, that may have tasted really good as well but I opted for small white chocolate chunks.

I was really going for something more...Spring-y =).

As I started mixing all the ingredients together, this wonderfully light smell of strawberries and cream floated through my kitchen. Yesss, I did the happy dance as I snuck a taste of the finished batter.

And after tasting it, I started bouncing around the kitchen =). My dog twitched her head from side to side while watching me...she probably thought I was crazy.

I was so excited to get these luscious balls of goodness into the oven! I couldn't be happier with the outcome. Hints of gooey strawberry marshmallow and white chocolate, yummy crispy crunch...I was in love. Although, I have to be honest, I have many "loves" when it comes to desserts. I can't be faithful and commit to just one ;).
Here's what you need and what you need to do:
INGREDIENTS
~2 sticks of unsalted butter, room temperature
~1 c granulated sugar
~2/3 c brown sugar, packed tightly
~1 large egg
~1/2 tsp vanilla extract
~1 1/2 c all-purpose flour
~1/2 tsp baking powder
~1/4 tsp baking soda
~1 1/4 tsp kosher salt
~3 c brown rice crispies (I used 365 Whole Foods brand, regular rice crispies are ok too)
~2/3 c small white chocolate chunks
~1 1/4 c HK marshmallows, cut into 1/4's (you can use regular mini marshmallows but you won't get the light strawberry taste)
DIRECTIONS
1. Combine the two sugars and butter in the bowl of a stand mixer. Cream together, using the paddle attachment, on medium speed for 2 minutes. Scrape down the sides of the bowl then add the egg and vanilla. Beat for 5 minutes.
2. Add the flour, baking powder, baking soda and salt. Mix on lowest setting until just combined. Take care to not over mix. Scrape the bowl once again.
3. Add the rice crispies and chocolate. Mix on low, again, until just combined. Last, add the marshmallows and mix until just incorporated.
4. Portion out the dough, into 2 or 3 disks, onto plastic wrap. Wrap tightly and refrigerate for at least 1 hour or up to a week. Do *not* bake cookies from room temperature, they will not hold.
5. Heat oven to 375 degrees F.
6. Using a 1 1/2" diameter ice cream scoop, scoop chilled dough onto a parchment lined sheet pan (using a Silpat is ok too). Make sure your cookies are at least 3-4" apart because these cookies spread!
7. Bake 5 minutes then rotate the pan because you want the cookies to bake evenly. Then bake an additional 5 minutes. Your cookies should be slightly brown and crisp on the edges when ready! Yummm!
8. Cool on a wire rack before transferring to a plate or air-tight container for storage.
Voila!

I hope you enjoy it! Maybe next time I'll switch it up and go tropical by using mango marshmallows and add some shredded coconut?! What other ingredients would you add/change to this delightful smorgasbord?
I saw these cute Hello Kitty marshmallows at a local Japanese store, which reminded me of the Momofuku recipe, I had to use them! I used to have Hello Kitty *everything* when I was a kid...pencils, erasers, book bags. Even now, I still love HK with their handbags and wallets. I'm a kid at heart, I guess =).

I wanted to try something a little different than Momofuku's Cornflake-Chocolate-Chip-Marshmallow Cookie recipe. Cornflakes? Nah, I love rice crispies! Plain marshmallows? Heck no! I love the strawberry filled/scented ones. Regular chocolate chips? Hmm, that may have tasted really good as well but I opted for small white chocolate chunks.

I was really going for something more...Spring-y =).

As I started mixing all the ingredients together, this wonderfully light smell of strawberries and cream floated through my kitchen. Yesss, I did the happy dance as I snuck a taste of the finished batter.

And after tasting it, I started bouncing around the kitchen =). My dog twitched her head from side to side while watching me...she probably thought I was crazy.

I was so excited to get these luscious balls of goodness into the oven! I couldn't be happier with the outcome. Hints of gooey strawberry marshmallow and white chocolate, yummy crispy crunch...I was in love. Although, I have to be honest, I have many "loves" when it comes to desserts. I can't be faithful and commit to just one ;).
Here's what you need and what you need to do:
INGREDIENTS
~2 sticks of unsalted butter, room temperature
~1 c granulated sugar
~2/3 c brown sugar, packed tightly
~1 large egg
~1/2 tsp vanilla extract
~1 1/2 c all-purpose flour
~1/2 tsp baking powder
~1/4 tsp baking soda
~1 1/4 tsp kosher salt
~3 c brown rice crispies (I used 365 Whole Foods brand, regular rice crispies are ok too)
~2/3 c small white chocolate chunks
~1 1/4 c HK marshmallows, cut into 1/4's (you can use regular mini marshmallows but you won't get the light strawberry taste)
DIRECTIONS
1. Combine the two sugars and butter in the bowl of a stand mixer. Cream together, using the paddle attachment, on medium speed for 2 minutes. Scrape down the sides of the bowl then add the egg and vanilla. Beat for 5 minutes.
2. Add the flour, baking powder, baking soda and salt. Mix on lowest setting until just combined. Take care to not over mix. Scrape the bowl once again.
3. Add the rice crispies and chocolate. Mix on low, again, until just combined. Last, add the marshmallows and mix until just incorporated.
4. Portion out the dough, into 2 or 3 disks, onto plastic wrap. Wrap tightly and refrigerate for at least 1 hour or up to a week. Do *not* bake cookies from room temperature, they will not hold.
5. Heat oven to 375 degrees F.
6. Using a 1 1/2" diameter ice cream scoop, scoop chilled dough onto a parchment lined sheet pan (using a Silpat is ok too). Make sure your cookies are at least 3-4" apart because these cookies spread!
7. Bake 5 minutes then rotate the pan because you want the cookies to bake evenly. Then bake an additional 5 minutes. Your cookies should be slightly brown and crisp on the edges when ready! Yummm!
8. Cool on a wire rack before transferring to a plate or air-tight container for storage.

I hope you enjoy it! Maybe next time I'll switch it up and go tropical by using mango marshmallows and add some shredded coconut?! What other ingredients would you add/change to this delightful smorgasbord?
March 6, 2012
Orange Dreamsicle Chia Seed Pudding - VEGAN / GLUTEN-FREE
I'm not sure what it is about Spring that makes me want to try new things. I want to try new outfits, shoes & of course, new recipes that I haven't tried before. I even tried zip lining, for the first time, a few weeks ago!! I seem to get this adventurous "bug" in me that I just can't contain lol. So when I saw a recipe from Whole Foods for Chia Pudding...I had to try it & make my own variations :D. I love the fact that it's so extremely simple to make. Healthy, fast & delicious...I like that combination!
INGREDIENTS
~~~~~~~~~~~~~~~~~~~~~~~~~~~~~~~~~~
Another variation I made was Cinnamon Peach :).

INGREDIENTS
INGREDIENTS
- 3 Tbs chia seeds
- 1 c unsweetened coconut milk (I use Trader Joe's brand)
- Juice of 1/2 an orange
- 1/2 tsp of vanilla bean paste (regular vanilla extract is ok too)
- pinch of sea salt
- 1/2 tsp orange zest (optional)
- 1/2 packet of Stevia sweetener or agave syrup (to taste) (I used Trader Joe's brand Stevia)
- Combine chia seeds & coconut milk in a small bowl. Stir well to combine, cover with plastic wrap & let rest in the fridge for 15 min.
- Add the rest of the ingredients & stir well.
- ENJOY!
~~~~~~~~~~~~~~~~~~~~~~~~~~~~~~~~~~
Another variation I made was Cinnamon Peach :).

INGREDIENTS
- 3 Tbs chia seeds
- 1 c unsweetened coconut milk
- 1/4 c of diced fresh or frozen peaches (let thaw if using frozen)
- 1/8 tsp of Saigon cinnamon
- pinch of sea salt
- 1/2 packet of Stevia sweetener or agave syrup (to taste)
January 24, 2012
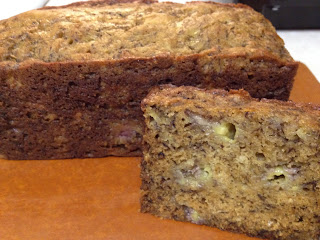
Soothing Banana Bread
Banana bread, so simple but so delicious! Sometimes I think my boyfriend buys too many bananas for us to eat in a weeks time so that when they're too ripe, I'll use those leftover bananas to make banana bread for him. I don't like having food go to waste & he knows this, so I usually oblige. Sneaky guy lol! Today was one of those days. Nothing like the smell of banana bread baking in the oven on a cold & rainy day to soothe your soul =).
4 bananas
1/2 cup sugar
1/4 cup brown sugar
1/2 cup unsalted butter, melted
1/4 cup whole milk
1 large egg
1 1/2 cups all-purpose flour
1 1/2 tsp baking soda
1 tsp salt
Preheat your oven to 350 degrees & spray your loaf pan. For this recipe, I used the Pullman Loaf Pan.

In a medium bowl, mash your bananas (I like to leave mine a little chunky) & add the next 5 ingredients in same bowl, mix then set aside.


In an additional medium bowl, combine the flour, baking soda and salt. Stir or whisk to mix thoroughly. Make a well in the middle of the dry ingredients.

Pour the wet ingredients into the well, stirring until just combined. DO NOT OVER MIX - your bread will come out tough & rubbery.

Pour batter into loaf pan & bake in the center of your oven for about 30-40 minutes. Insert a toothpick into the center of the loaf & make sure it comes out clean.

Move pan to cooling rack & let cool for about 15 min. After 15 min, remove loaf from the pan & let it finish cooling for an additional 15 min.

 Loaf can be stored in an airtight container for up to 2 days.
Hope you enjoy!
The Recipe
4 bananas
1/2 cup sugar
1/4 cup brown sugar
1/2 cup unsalted butter, melted
1/4 cup whole milk
1 large egg
1 1/2 cups all-purpose flour
1 1/2 tsp baking soda
1 tsp salt
Preheat your oven to 350 degrees & spray your loaf pan. For this recipe, I used the Pullman Loaf Pan.

In a medium bowl, mash your bananas (I like to leave mine a little chunky) & add the next 5 ingredients in same bowl, mix then set aside.


In an additional medium bowl, combine the flour, baking soda and salt. Stir or whisk to mix thoroughly. Make a well in the middle of the dry ingredients.

Pour the wet ingredients into the well, stirring until just combined. DO NOT OVER MIX - your bread will come out tough & rubbery.

Pour batter into loaf pan & bake in the center of your oven for about 30-40 minutes. Insert a toothpick into the center of the loaf & make sure it comes out clean.

Move pan to cooling rack & let cool for about 15 min. After 15 min, remove loaf from the pan & let it finish cooling for an additional 15 min.


Hope you enjoy!
Subscribe to:
Posts (Atom)

